Hazard safety signs play an essential role in the management of your safety, warning your staff and visitors of any potential dangers on the premises.
Hazard signs have a yellow triangle with a black pictogram or symbol on a yellow background with a black border. The yellow part has to be at least 50% of the area of the sign. Many of the hazard symbols currently used have been updated to bring them in line with the new ISO 7010 legislation.
Each sign is categorised as the above depending on the severity of the risk. For example, signs with the word “Danger” are used where the risk is deemed to be higher than those signs using the word caution.
In situations of emergency evacuation, especially when confronted by power failure, a way guidance system using photoluminescent signs and markers will help to indicate clearly defined escape routes, saving critical time for the evacuation of the building.
BS 5266-6: 1999, is a Code of Practice for non-electrical low-mounted way guidance marking using a photoluminescent system. It recommends how to plan, design, install and maintain the system when used in conjunction with powered emergency lighting. The use of this standard, combines with BS ISO 16069:2004, Graphical symbols – Safety signs – Safety way guidance systems and BS 5499-4: 2000, Code of Practice for escape route signs, gives the answers to most questions that could be asked from those contemplating installing a photoluminescent way guidance system.
The installation of a photolumiescent way guidance system does not replace the use of powered emergency lighting when this is required, but compliments its existence. For a satisfactory performance, photoluminescent materials require initial activation from a good light source.
The recently published part II of BS5499. provides a uniform family of water safety signs based on the signs produced by the National Water Safety Committee. These signs should be used at all locations where sport or recreational activities are taking place, to warn the public of possible hazards or dangerous situations and to give specific instructions for their safety.
There are three main types of water safety signs you will find when you are around water. Each one has its own meaning, but all of them work to the same system. If you go to the seaside, then there are sometimes special flags to also look out for.
In addition to the water safety signs, you will also find information signs telling you where the toilets are or where you can get first aid. They will also tell you where the public rescue equipment is held.
Water safety signs
1. Hazard Signs
Triangle shaped
Yellow background, with black symbols
They are placed to help you spot a hazard that is not always obvious
They mean that you should be aware of something.
2. Prohibition Signs
Signs that mean you should not do something, are always:
A red ring shape, with a line running through
White background, red line and black symbols or shapes
They inform you of things you are not supposed to do
These signs tell you that it would be dangerous to do something, or go in that place.
3. Mandatory Signs
Signs that mean you should do something, are always:
Blue and circle shaped
White symbols or shapes
They inform you of things you need to do
These signs tell you that you should do something to be safe.
Other signs you might see
Information signs, are always:
White background
Black symbols or text
These signs help you either find something, or get somewhere.
First aid signs are always:
White symbols or text
These signs tell you where important safety items are such as the first aid place, or the emergency telephone.
Water safety flags
At beaches there are flags to tell us when and where it is safe to use the water.
This red flag means it is unsafe to be in the water.
Under BS EN 3 operative from the 1st January 1997, all new certified fire extinguishers used in European Union countries must feature red bodies. In line with familiar UK practice, BS 7863 allows manufacturers to affix coloured identification panels on or above the operating instructions covering no more than 5% of the body surface area and visible through a horizontal arc of 180 degrees when the extinguisher is mounted.
The new harmonised European standard on fire extinguishers – BS EN3 – which came into effect in 1st January 1997, provides a single standard for fire extinguishers across Europe. It replaced the old British Standard BS 5423, which has now been withdrawn.
BS EN3 is the standard now used for the specification, manufacturing and purchase of extinguishers in the UK. An additional standard BS 7863 details the revised colour coding system and supplements BS EN3.
BS EN3 is not retrospective and pre-existing extinguishers do not need to be replaced with extinguishers to this new standard. However, any replacements as a result of damage, wear or un-serviceability or new extinguishers will need to meet this new, later standard. While BSEN3 has now been in place for a number of years, understanding the colours and codes should be part of your regular health and safety training and form part of your new staff induction programme. There are a number of resources such as Fire Extinguisher Colour Guide Code Charts that can serve as staff information points and training aids. Fire Extinguisher location panels can aid your routine premises maintenance. As well as providing information on the use of the particular fire extinguisher mounted they also give a visual warning as to when the extinguisher has been used and not replaced.
The New Standard Fire Extinguisher Standard The main differences between the old and new standards are:
A minimum of 95% of the extinguisher body must be red
Zones of colour, indicating the contents of the extinguisher, are permitted
The markings on the extinguisher must follow a specified layout
Pictograms are used indicating the type of fires that the extinguisher is suitable for
A minimum body shell thickness is specified
Minimum fire performance ratings for the size of the extinguisher are specified
Operating temperatures of some extinguishers are increased
Some discharge times are increased
Although there are many technical changes and the improvements in the new standard, the most noticeable change is to the colour of the extinguisher bodies.
Fire Extinguisher Colours and Codes
Understanding the colours and codes should be part of your regular health and safety training and form part of your new staff induction programme. In the UK we were used to a system of using the colour of the body of the extinguisher to indicate its contents. However, this system has been peculiarly British with all extinguishers in Europe being coloured completely red.
Since extinguisher colour is no longer used to identify the type of the extinguisher, it falls to the standard pictograms to illustrate the types of fire that extinguisher can be used on. The pictograms are:
Class A fires involving organic solids; e.g. wood, paper Class B fires involving flammable liquids Class C fires involving flammable gases Class F fires involving cooking oil and fat
A concession was made in this latest standard for a small zone of colour to be available on the body of the extinguisher to further help identify the contents of the extinguisher. A colour zone of up to 5% of the surface area of the extinguisher can be positioned on the top half of the front of the extinguisher body and be visible from 180 degrees. The British Standard BS 7863 outlines the colours that can be used in this way and follows the colour coding that has been used for many years. In addition, there is now a new colour for the Wet Chemical extinguisher (see guide above). The colour codes are:
Red – Water Cream – Foam Blue – Powder Black – Carbon Dioxide Canary Yellow – Wet Chemical
A further effect of the latest standard is that customised colours (most commonly chromed stainless steel) are no longer allowed; although, as there is no immediate need to change these extinguishers, they (and particularly the stainless extinguishers) may well be in use for some considerable time.
Replacement of Extinguishers Even though pre-existing extinguishers do not need to be replaced, the gradual appearance of the new, latest standard extinguishers alongside older types may cause some confusion. The continued presence of other coloured extinguishers in an area may suggest to some users that the red extinguishers will contain water but this might not be the case, with potentially serious consequences.
Everyone should now what to do in the event of a fire and this includes being able to select the appropriate type of extinguisher to use. To reduce the chances of confusion, mixing new and old standard extinguishers in the same area or building should be avoided.
Note also that the British Standard on servicing BS5306: Part 4 states that all extinguishers installed in any one building or single occupancy should have the same method of operation and, if intended for the same function, should all be similar in shape, appearance and colour.
Summary for Fire Extinguisher Identification
Ensure that all new extinguishers obtained comply with BS EN3
Ensure that everyone is able to identify the different types of fire extinguisher and their respective use through training and guides
Provide information on the colour standards for fire extinguishers
Do not mix extinguishers conforming to the old and new standards
Do not mix extinguishers which have different operating methods
Stocksigns has the largest range of fire safety signs on the market for more information on these and our other safety signs why not order our safety signs catalogue or call our Sales Team on 01737 77 40 72.
Emergency lighting is designed to illuminate automatically the emergency escape route (i.e. staircases, landings, passageways etc.) upon failure of the supply to the normal artificial lighting. The emergency lighting must comply with BS 5266: 2005. It is vital that emergency lighting comes on if the normal lighting fails. It needs to be sufficiently bright, illuminated for enough time, and the light sources so positioned that the staff and visitors of a building can be evacuated safely in an emergency
Siting of Luminaires
Luminaires should be sited in the following positions:
At each exit door
At each intersection of corridors
At each change of direction
Close to each staircase
Close to any change in floor level
Close to fire equipment and alarm call point locations
At locations that adequately illuminate emergency escape and safety signs
Maintained & Non-maintained Systems.
Non-maintained systems are used in buildings with a limited occupation time, such as offices and shops, and only operate when the power fails. In general, Maintained systems are required for places of entertainment and licensed premises and can be on all the time from normal mains supply, remaining on when the power fails.
For more information contact our sales team on Tel 01737 77 40 72 or sales@stocksigns.co.uk
Safety signs and Disability Discrimination Act
On October 1st 2004 the final stage of the goods, facilities and services provisions part 3 of the Disability Discrimination Act came into force. Although the legislation has been in place for some time our need to meet the guidelines is still firmly in place. This article is a reminder of what we need to consider in terms of signs and our obligations to the DDA.
The aim of this legislation is to achieve equality between the disabled and able-bodied; it introduces a basic duty not to treat disabled people less favourably than others. The new basic duty or obligations apply to anyone providing a paid or unpaid service to the public. As a “service provider” you must ensure that access is available to all disabled people and that entry routes, facilities and all information are clearly defined and indicated by suitable signage. The regulations concern access, mobility and site signage, they apply to all service providers, ranging from large corporations to small businesses (not the owners of the premises).
Under recent changes to part 2 of the Act, all employers must now ensure that they do not discriminate against disabled people in terms of recruitment and employment conditions. Compliance with the DDA can be achieved effectively by most businesses within a modest budget; however, planning is essential to ensure that the disabled user is not at a disadvantage. The new provisions are a further important step towards ensuring that disabled people have access to services that others take for granted.
10 Sign areas to consider with the Disability Discrimination Act
You are required to make reasonable adjustments to your premises; the areas to be considered are the signing and marking of:
For additional advice on signage and the DDA we would recommend carrying out a site survey for your premises.
Over the next few months we will see the adoption of a new standard for safety signs as ISO 7010 is soon to become Pr EN 7010. The change will see safety signs in the workplace move away from being an “International standard” (essentially a recommendation on best practice), to a European norm (meaning the contents of the standard must be written into UK and EU law). ISO 7010 has been developed to provide consistency in design across the EU. We will be phasing in the new designs throughout 2011 and you may notice some design changes to the symbols whereas others will look virtually unchanged. Whilst the new symbols will be replacing the old designs, both designs will still meet your safety obligations.
ISO 7010 – An Overview.
In the late seventies, as the European Community was coming into being, it was recognised that with a large migratory workforce within the EU countries, there would be a real problem communicating health and safety issues.
It was decided to create an international standard based on pictograms. This lead to the publishing, in 1984, of the first health and safety standard; ISO 3864-Safety Colours and Safety Signs, which is still current today and is the basis for both ISO 7010 and BS 5499.
Because ISO 3864 was not grounded in law, it did not become established across the EU. So, in 1992, a European Directive based on ISO 3864 was passed, which made it a legal requirement for member states to write the requirements into their countries health and safety legislation, this was EC Directive 92/58/EEC.
In the UK this took the form of the “Health & Safety (Signs and Signals) Regulations 1996.
The Directive was a bit vague regarding the symbols to be used and soon a variety of different symbols had developed across Europe, the “Euro” fire exit symbol being a good example.
The situation regarding these symbols now needed to be rectified.
Here in Britain, this lead to the revision of the previous standard and in 2002, BS5499:2002 Graphical Symbols and Signs, was issued.
The need for correct pictograms across Europe was now evident and so the International Standards Organisation were compelled to update their own standards and so, using BS 5499 as a basis, they split ISO 3864 into two parts:
ISO 3864:2002 – covering shape and colours, as before.
ISO 7010:2003 – covering pictograms.
As previously seen in the Eighties, for these changes to have any impact, it would be necessary to write this standard into law, which is the process we are in the middle of now.
Making ISO 7010 into an EN, means that the status of the standard will change from being a recommendation of best practice, to a European Norm, requiring that the contents of the Standard are written, without change, into all EU countries laws.
This means that there will be a legal requirement for the same sign to be used in every country for the same requirement.
It will mean that a fire exit sign in England will be the same as it would be in France, Spain, Germany or anywhere at all within the EU.
ISO 7010 – A Brief History – milestone timeline
Late seventies – large migratory workforce in the EEC
1978 – BS 5499 – Fire Safety Signs, Notices and Graphic Symbols
1992 – EC Directive 92/58/EEC
1996 – “The Health & Safety (Signs and Signals) Regulations
2002 – BS 5499:2002 – Graphical Symbols and Signs
2003 – ISO 3864:2002 and ISO 7010:2003
our new 2011 catalogue is has been completely updated to include the NEW ISO 7010 safety symbols
Safety signs are placed around shops and businesses, typically warning staff, customers and passersby that there is a hazard or safety issue. The safety signs over time can become dull and dirty from various elements that accumulate on them, this can obscure the valuable workplace safety message but also can make your premises look unkempt. These signs are often made of a hard rigid plastic, vinyl or aluminium, allowing you to easily clean your safety signs with inexpensive ingredients. For added protection and increased longevity email our sales team about having your safety signs made with “POF” protective overlay film.
Things You’ll Need to clean your safety signs:
Bucket
Water
Mild soap
Vinegar
Cleaning rag
Nylon brush
Instructions for Cleaning your safety signs
1. Fill a bucket with about 2 litres warm water and 2 tbsp. of a mild detergent such as washing up liquid or laundry detergent. For a disinfectant quality, add an optional 1/2 cup of white vinegar.
2. Dip a soft cleaning rag into the cleaner and wipe it over your safety signs.
3. Very gently swish a nylon scrub brush into the cleaner if needed when heavier residue is present, again wiping over the sign until all grime is removed.
4. Wipe down the sign again with a clean, damp rag and allow to air dry.
Safety signs and symbols are important safety communicating tools, they help to indicate various hazards that present in plant site or workplace. At the same time, they warn workers to always keep watching out for those hazards by giving required information and safety instructions.
Safety signs and symbols do not only inform the presence of hazards, but also help create workers’ safety awareness. It is very important in reducing accidents in the workplace more obviously in maufacturing, heavy industry and on construction sites but also important in office based environments too.
To get the most out of health and safety signs and symbols, you should choose the right ones for each work location on your premises. Each work area needs different workplace health and safety signs and symbols. This is because each work area has different types of hazards. A risk assesment of each activity or designated area will help identify hazards. Appropriate actions for ensuring safety can then be drawn up and selecting the appropriate safety signs can then be selected. Where possible safety signs shown be changed (at least their location) to keep the safety message fresh and to avoid “sign blindness”.
Safety Signs and Symbols Standards
Safety signs and symbols consist of messages, words and pictorial symbol with variety of sizes, shapes and colours. All the shapes and colours are standardised. Each shape has different meaning and each colour reflects specific meaning.
Using standardised health and safety signs and symbols will make them understandable and overcome language barriers and the new ISO 7010 standard is the first step towards a global harmonization of safety symbols. More indepth infomation can be found at Safety Signs, Symbols and Colour Codes – a simple guide
Safety Signs – Shapes
The shapes of workplace health and safety signs are triangles, circles and squares or rectangles.
i. Triangles: indicates caution (potential hazards) or warning (definite hazards), for example toxic gas and electric shock.
ii. Circles: mandatory or recommended actions and are normally used to depict an action you must do, for example wearing eye goggles and safety hard hats.
iii. Squares or rectangles: shows information, i.e. general information and emergency information (first aid, fire fighting).
iv. A Circle with a 45° diagonal slash across the middle from the upper left to the lower right: points out forbidden or prohibited actions.
Safety Signs – Colours
The colours used in workplace safety signs and symbols are red, yellow, blue and green.
i. Red signs: designates areas for emergency devices like fire fighting equipment, or to emphasise unsafe or forbidden actions.
ii. Yellow: notifies workers to take caution and be alerted of hazards, reducing necessary risks.
iii. Blue: shows a particular action or behavior, for example instruction to wear personal protective equipment.
Simple pocket guide with at a glance guide to the different colours and symbols used in safety signs make excellent reference material for workplace safety training and can be issued as part of new employee induction training.
A substantial body of research shows that using a hand-held or hands-free mobile phone while driving is a significant distraction, and substantially increases the risk of the driver crashing.
Safety Signs and Training for Drivers
Stocksigns offer a range of transport safety signs and driving resources to help protect your staff and fleet. As a working partner of RoSPA we are proud to offer access to RoSPA Fleet Training and consultancy as well as a host of traffic signs.
For more details on Driver Development courses, Advanced Driver Training and Driver Risk Assessment tools such as “Driver Profiler” please call us on 01737764764 for more information.
The issue of drivers using mobile phones just won’t go away, government and police schemes to raise awareness of the dangers of mobile phones has failed to eradicate the problem. We have a range of safety posters and signs to help you look after your staff and fleet including prohibition signs, traffic signs, information signs and hazard signs. Visit our signs shop or order a catalogue to learn more.
Drivers who use a mobile phone, whether hand-held or hands-free:
Are much less aware of what’s happening on the road around them.
Fail to see road signs.
Fail to maintain proper lane position and proper speed.
Are more likely to ‘tailgate’ the vehicle in front.
React more slowly and take longer to brake.
Are more likely to enter unsafe gaps in traffic.
Feel more stressed and frustrated.
They are also four times more likely to crash, injuring or killing themselves and/or other people – RoSPA
The use of symbols and graphical images is a simple safety system used to convey safety messages at a glance. Colours and symbols appropriately used can provide information and warnings of hazards which are essential to safety at work, and in some instances may be independent of language.
The Health and Safety (Safety Signs and Signals) Regulations 1996 require employers to provide and maintain safety signswhere there is significant risk to health and safety that has not been avoided or controlled by other means (e.g. safe systems of work) provided that the use of a sign can help reduce the risk. They also require, where necessary, the use of road traffic signs in workplaces to regulate road traffic. Employers must also ensure that all employees receive appropriate information, instruction and training regarding safety signs. Although most signs are self-explanatory, some employees (particularly young or new workers) may be unfamiliar with the signs used.
What is a safety sign?
A safety and/or health sign is defined as ‘information or instruction about health and safety at work on a signboard, a colour, an illuminated sign or acoustic signal, a verbal communication or hand signal.’
A signboard is a combination of shape, colour and symbol or pictogram made visible by adequate lighting and which may have supplementary text.
What are the 4 types of safety signs?
There are four different types of safety signs:
Prohibition / Danger Alarm Signs
Mandatory Signs
Warning Signs
And Emergency
Each of these signs has its own colour with different variety of signs.
Safety sign colours
What do Red safety signs mean?
When a sign is Red, it’s usually a prohibitory sign that aims to grab people’s attention for a dangerous situation nearby, such as preventing people from smoking in an area containing flammable materials.
What do Yellow or Amber safety signs mean?
Similarly to traffic lights, yellow or amber signs send a warning to viewers, which is an indication to take precautions in the environment their in. This includes being in an area with dangerous chemicals, high voltage electrical equipment or even to be careful of the step on the street.
What do Blue safety signs mean?
Blue safety signs are mandatory signs which instruct people to undertake an action before proceeding. This could be wearing protective clothing, keeping a fire door shutt, making sure premises are tidy and applying hand sanitiser.
What do Green safety signs mean?
Green safety signs are informative for the reader to signal safety, directing them to areas such as exit routes, first aid stations and assembly points.
What are combination safety signs?
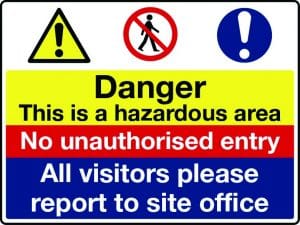
Under ISO 7010 legislation safety signs can be combined to give multiple messages.
This sign gives a hazard warning (yellow) that the site is dangerous. It gives a prohibition instruction (red) that there must be no unauthorised entry and a mandatory instruction (blue) that a course of action must be taken – visitors report to site office.
These multi message signs are ideal for construction sites or garage forecourts where a combination of messages can be delivered in one place in potentially dangerous environments.
When are barrier tapes used?
Barrier tape can be used where the marking of dangerous locations is deemed necessary (e.g. highlighting the edge of a raised platform or area or restricted heights). They can be used internally or externally to help alert people of a hazard or danger.
We supply a range of different tapes such as reflective hazard warning tapes, self-adhesive photoluminescent tape, graphic barricade tape and pipeline identification tape. Please call a member of a sales team on 01737 774072 to discuss your tape requirements.
ISO 7010
Large elements of the British Standard BS5499 symbols have been changed since the introduction of ISO 7010. The basic principles of understanding safety symbols have remained the same i.e. colour and shape of out line symbol but some of the icons/symbols have changed.
For more advice contact our sales team on 01737 774072 or send us an email.
Stocksigns ideas to help build your green credentials
Many companies are committed to recycling and purchasing non-toxic supplies, but they still work in buildings whose materials, electrical systems and waste systems were in place long before being “eco” became the business buzz word of the moment and before the economic benefits of being green were truly understood. Different companies will have different factors to consider when improving their green credentials. For example a solicitors firm will have different concerns than a construction site. But one way (more…)
Stocksigns has developed a new safety sign incorporating a Gas Horn. Gas horns are ideal fire alarm device’s where a conventional fire alarm system is inappropriate. For example, building sites, concrete plants, quarries, workshops and temporary buildings. They are suitable for internal and external use. The Air horn sign enables you to spot missing safety equipment at a glance. For more information email dharbison@stocksigns.co.uk
With your consent, we'll use cookies on our website for statistics and marketing purposes, and to to give you the most relevant experience by remembering your preferences and repeat visits. Learn more about how we use cookies on our website.
This website uses cookies to improve your experience while you navigate through the website. Out of these, the cookies that are categorized as necessary are stored on your browser as they are essential for the working of basic functionalities of the website. We also use third-party cookies that help us analyze and understand how you use this website. These cookies will be stored in your browser only with your consent. You also have the option to opt-out of these cookies. But opting out of some of these cookies may affect your browsing experience.
Necessary cookies are absolutely essential for the website to function properly. These cookies ensure basic functionalities and security features of the website, anonymously.
Cookie
Duration
Description
AWSALBCORS
7 days
This cookie is managed by Amazon Web Services and is used for load balancing.
cookielawinfo-checkbox-advertisements
1 year
This cookie is set by the cookie consent popup to record the user consent for the cookies in the category "Advertisements".
cookielawinfo-checkbox-analytics
1 year
This cookie is set by the cookie consent popup to record the user consent for the cookies in the category "Analytics".
cookielawinfo-checkbox-functional
1 year
This cookie is set by the cookie consent popup to record the user consent for the cookies in the category "Functional".
cookielawinfo-checkbox-necessary
1 year
This cookie is set by the cookie consent popup to record the user consent for the cookies in the category "Necessary".
cookielawinfo-checkbox-others
1 year
This cookie is set by the cookie consent popup to record the user consent for the cookies in the category "Other".
CookieLawInfoConsent
1 year
This cookie is set by the cookie consent popup to record the default button state of each category.
viewed_cookie_policy
1 year
The cookie is set by the cookie consent popup and is used to store whether or not the user has consented to the use of cookies. It does not store any personal data.
__stripe_mid
1 year
Installed by Stripe, this cookie is required to process payments.
__stripe_sid
30 minutes
Installed by Stripe, this cookie is required to process payments.
__zlcmid
1 year
This cookie is set by our chat widget Zopim, to help identify a user's chat session between page loads.
Functional cookies help to perform certain functionalities like sharing the content of the website on social media platforms, collect feedbacks, and other third-party features.
Analytical cookies are used to understand how visitors interact with the website. These cookies help provide information on metrics the number of visitors, bounce rate, traffic source, etc.
Cookie
Duration
Description
CLID
1 year
Used by Microsoft Clarity to identify the first time Clarity saw this user on any site using Clarity.
iutk
5 months 27 days
This cookie is used by Issuu analytics system to gather information regarding visitor activity on Issuu products.
SM
session
Set by Microsoft to synchronise the MUID cookie across Microsoft domains.
_clck
1 year
This cookie is set by Microsoft Clarity to store a user's ID and preferences, and is unique to this site and their browser. This ensures that behaviour in subsequent visits to this site will be attributed to the same user ID for analytical purposes.
_clsk
1 day
This cookie is set by Microsoft Clarity to connect multiple page views by a user into a single Clarity session recording.
_ga*
2 years
This cookie is installed by Google Analytics. The cookie is used to calculate visitor, session, campaign data and keep track of site usage for the site's analytics report. The cookies store information anonymously and assign a randomly generated number to identify unique visitors.
_gat
1 minute
This cookie is installed by Google Universal Analytics to restrain request rates and thus limit the collection of data on high traffic sites.
_gat_gtag_UA_75775717_1
1 minute
This cookie is set by Google Analytics and is used to limit requests (throttle request rate).
_gcl_au
3 months
Set by Google Tag Manager to analyse advertisement efficiency of websites using their services.
_gid
1 day
This cookie is installed by Google Analytics. The cookie is used to store information of how visitors use a website and helps in creating an analytics report of how the website is doing. The data collected includes the number of visitors, the source where they have come from, and the pages visited in an anonymous form.
Advertisement cookies are used to provide visitors with relevant ads and marketing campaigns. These cookies track visitors across websites and collect information to provide customised ads.
Cookie
Duration
Description
ANONCHK
10 minutes
The ANONCHK cookie, set by Bing, is used to store a user's session ID and also verify the clicks from ads on the Bing search engine. The cookie helps in reporting and personalisation as well.
IDE
1 year 24 days
Google DoubleClick IDE cookies are used to store information about how the visitor uses the website to present them with relevant ads.
mc
1 year 1 month
Quantserve sets the mc cookie to anonymously track user behaviour on this website.
MUID
1 year 24 days
Bing sets this cookie to recognise unique web browsers visiting Microsoft sites. This cookie is used for advertising, site analytics, and other operations.
SRM_B
1 year 24 days
Used by Microsoft Advertising as a unique ID for website visitors.
test_cookie
15 minutes
Set by doubleclick.net and used to determine if the user's browser supports cookies.
_uetsid
1 day
Bing Ads sets this cookie to engage with a user that has previously visited the website.
_uetvid
1 year 24 days
Bing Ads sets this cookie to engage with a user that has previously visited the website.